For someone who might not be familiar with the numbers and letters on a TRAILER TIRE, replacing one could prove frustrating. We will break down the metric size designation found on most trailer tires so that identifying your needs should be simple. For an example we will be identifying the meaning of the numbers and letters on a

ST stands for “Special Trailer” and signifies its use for trailers only.
205 is the “Section Width” of the tire in millimeters when mounted on the specified rim and inflated to the maximum pressure. The Section Width is the measurement of the overall width of the tire not including any protruding letters or protective ribs around the outer sidewall. To convert this to inches simply divide the number by 25.4
205 divided by 25.4 = 8.07″
75 is the aspect ratio of section height to section width. Also known as the series number or profile of the tire, this number means that the height of the tire is 75% of the width. So since we know that the Section Width is 8.07″ then that means 75% of 8.07 is the section height. (8.07 x .75 = 6.05″)
R designates the tire as a Radial Ply as appose to a Bias Ply (D Designation). For a more technical look at the difference check this out.
14 is the rim size. This is the diameter of the rim measured in inches from bead to bead. The actual physical diameter will measure slightly larger then the listed size because the beads are inside the lip of the rim.
Another number set that you will find on a tire is the Birthday. This will be represented by a 4 digit number inside of an oval. The first two digits are the Week # and the second two digits are the Year. 0214 Would mean they were manufactured in the 2nd week of 2014.
We hope this was helpful in identifying what the numbers and letters mean on your trailer tire. Remember to always run your trailer tires at maximum PSI filled when cold. To check out our full list of tires and more Tech info visit us at www.TrailerTires.com
Posted Under:
Trailer Tires & Wheels
This post was written by
ghoj on January 27, 2015
Comments Off on Decoding Metric Trailer Tire Sizes
 Tis’ the Season for Snow Plow Parts and Salt Spreaders. We have been steadily expanding our offering on both Plows and Spreaders. We stock a wide selection of Aftermarket Snow Plow Parts and Accessories for most major brands including Meyer, Western, Diamond, Fisher, Sno-Way, Blizzard and Boss. On the spreader front we offer, Walk-Behind and Tailgate Spreaders for residential and light commercial use and Municipal Hopper and Dump spreaders for municipalities and contractors.
We carry a wide range of different Snow Plow Products including, Angling Cylinders, Solenoids, Curb Guards, Light Kits, Wiring Harnesses, Control Assemblies, and much more. We also carry ‘Under the Seat’ emergency kits for most OEM’s. The kits include some of the crucial/most common hardware to complete a roadside repair on common issues. All in stock orders with snow plow parts on them, if received by 2:00 pm, will ship the same day.
The Spreaders that we carry range in size from a 1.5 Cubic Ft. all the way up to a 13.8 Cubic Yard municipal hopper. We carry spreaders capable of both salt and sand operations. The Spreaders, because of their size, ship directly from the manufacture (refer to individual spreader for ship times).
Posted Under:
Snow Plow Parts
This post was written by
ghoj on December 22, 2014
Comments Off on Snow Plow Parts and Salt Spreaders
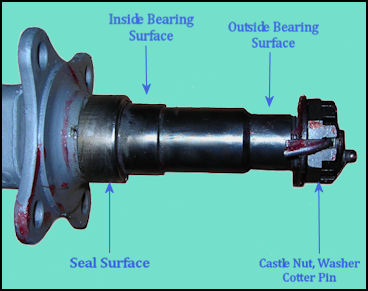
There are a few common spindle sizes found on Trailer Axles rated at 3,500lbs or less. These are the most common axles found on Boat Trailers, Small to Medium Sized Utility Trailers, Snowmobile Trailers, and more. There are 4 main areas of importance on the spindle to consider when purchasing a Trailer Hub or Bearings. They are, Seal Surface, Inner Bearing Surface, Outer Bearing Surface, and Thread Surface.
One of the most common trailer spindles out there is a 3,500lb “Tapered Spindle” (when bearings have different Inside Diameter’s). This spindle is usually found with a 4-hole brake flange welded to the axle. The flange is there for Trailer Brakes to be mounted but does not have to be used. Here is a diagram showing the 4 important areas on a 3,500lb spindle:
Another commonly found spindle is when both bearing Inside Diameter’s are the same and this is called a “Straight Spindle”. These spindles are commonly found on axles rated at less than 3,500lbs. Most trailer manufactures used and still use what is referred to as a “Standard Spindle” while others used, less commonly, what is referred to as a “Short Spindle”. If the Hub is available to measure, than Hub Length* can be used to determine the difference. If the hub is not available you can measure the spindle from the seal surface shoulder to the beginning of the thread as shown:
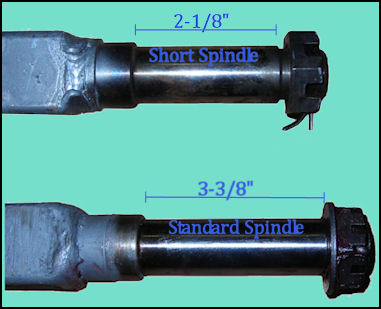
*Hub Length is the distance through the center of the hub from casting edge to casting edge. A “Standard Spindle” hub will measure between 4” and 4-1/16” while a “Short Spindle” hub will measure 3-1/2”.
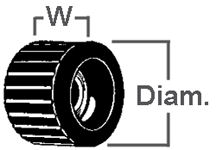
Wobble Rollers are found on boat trailers that have a hand winch or power winch to pull the boat up onto the trailer. The rollers are designed to provide a minimum amount of resistance and allow the boat to roll up to the winch stand. The way the rollers are mounted is supposed to help center the boat as well. When replacing the wobble rollers on your boat trailer there are a few key measurements to take before purchasing.
Overall Roller Dimensions:
Measure the Diameter of the roller and the width of the roller
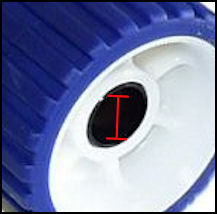
Bushing ID:
Measure the inside diameter of the bushing/The size of the opening from top to bottom.
Shaft Diameter:
Measure the diameter of the shaft at its widest point (some may not be completely round).

NOTE: Shaft Diameter and Bushing ID should always be different. The difference is usually 3/32” but can vary. The difference is what will allow the roller to wobble.
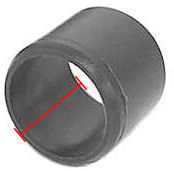
Bushing/Bearing Length:
Measure the distance through the center of the bushing from one edge to the other.
Posted Under:
Trailer Rollers
This post was written by
ghoj on July 23, 2014
Comments Off on Measuring A Boat Trailer Wobble Roller
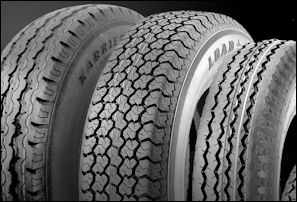 There are many things to consider when determining which Trailer Tire is right for your trailer. We are going to discuss the main points that need to be addressed when outfitting your trailer with new Trailer Tires. Should you use Radial or Bias-Ply? Should you use Load range C or Load Range D? Do I have to use an ‘ST’ tire? These are all good questions.
First off, we will revisit the Radial vs. Bias-Ply debate that was covered in a previous blog, only today’s entry will be much briefer. Radial tires are going to be better suited for highway/high volume usage. This is because they tow better at higher speeds and last longer than a Bias. They also shed heat better, reducing the risk of blow-outs on long hauls. Bias Ply tires are cheaper alternatives that perform just fine under moderate to low use on mainly secondary (around town) roads. You can absolutely use them on the highway; they just won’t perform as well or last as long as a Radial.
Secondly, we will address how to determine the appropriate Load Range (L.R.) for your trailer tires. I would like to address the common perception that a higher L.R. automatically means a higher quality tire; this is not always the case. The L.R. should be determined by using the GVW or Gross Vehicle Weight. Depending on the type of trailer, tongue weight can be anywhere from 10-20% but we do not like to use that weight in our equation so that there is a built in safety margin. Take the GVW and divide it by the amount of tires. This will give you the minimum poundage that each tire should be rated at. Keep in mind that the higher the L.R., a higher PSI will be needed. If you go over and above on L.R. then the PSI will be higher than needed making the tires very hard and bouncy.
Finally, it is always recommended that an ‘ST’ or ‘LT’ tire should be used on trailers. This is a common question because many trailers are outfitted with tires that have a ‘P’ on them. A ‘P’ on the tire means that it is meant for use on a Passenger vehicle (car tire). ‘P’ tires are round and rubber and will surely fit on a trailer, but are not recommended due to the construction of the tire. ‘ST’ tires are designed to be towed and have stronger sidewalls needed for trailers.
We hope this was helpful but if you have additional questions, please give us a call @ 1-800-453-7379.
Posted Under:
Trailer Tires & Wheels
This post was written by
ghoj on June 5, 2014
Comments Off on Trailer Tires & What to Consider
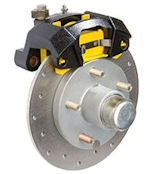 Disc brakes are not all created equally. Where and how you use them should help you decide on what to buy. Today’s disc brakes typically come in three types: painted or E-coat/ Dacromet coating, or stainless steel. The calipers are made the same, with some manufacturers offering them in aluminum also. If you plan to use them with an electric over hydraulic actuator, you will have to go with one made from steel. The aluminum calipers may not able to handle the added pressure from this type of system, designed for disc brakes.
 In fresh water the E-coat will work well, but for a little extra money you can go with the Dacromet coating which should last longer with less maintenance. In brackish or salt water the E-coat offers little protection and is not an option you should consider. There are hybrid kits where the hub and rotor have the Dacromet coating, but the caliper is stainless steel. Being the most important part of the system, this will provide the best caliper available at a reduced cost of an all stainless system.
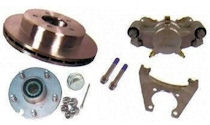 If you use the trailer often in salt or brackish water, going with an all stainless system is your best option. The initial cost may be a bit shocking over the other options, but down the road you will thank yourself for having spent the extra money. Typically the Dacromet or Dacromet/Stainless kits offer a 3 year warranty, where the all stainless kit (offered in both 10″ and 12″ ) will double this and provide a 6 year warranty. If you are tired of working on your trailer brakes instead of being out on the boat, consider going with all stainless disc brakes like what we offer from Kodiak. Having peace of mind in my opinion while towing, is priceless.
Written by Chris B.
Posted Under:
Trailer Brakes
This post was written by
ghoj on May 6, 2014
Comments Off on Boat Trailer Disc Brakes, What you need to know.
 It’s the great American summer, kids off school, everyone taking vacations and planning road trips with their RV’s that sat waiting through the long winter for this opportunity. Dust everything off, fire everything up and load that puppy up. It’s time to go where you’ve never gone before, see things you always wanted to see in the comfort of your own RV. Finally, wheels rolling!
But what happens when the heat and the humidity start to follow you on your road trip? Do you know the main cause of failures on RVs and campers is brought on by the blazing heat of the summer?
Tires, tires, tires.
The most important part to your trip and yet often the most overlooked part as well. If you’re hot then you know the black top is hot, if the blacktop is hot then the rubber tires are suffering. Take that heat and drive down into Texas or lower New Mexico and you could be in a bad place if you haven’t checked them recently. Always check the tire pressure in your tires and look them over before any trip, be it large or small. You never know when a little rubber could come between you and your vacation experience!
There’s another beast that can make your vacation hot, sweaty and miserable. It happens suddenly, that warm feeling and sweat starts to trickle down your back, suddenly you’re sticking to the seat when you weren’t a moment ago. You don’t want to look but you have to, glance at the thermostat and you know instantly.
The air conditioning stopped working!
With the heat waves hitting the country it’s no wonder people are grumpy and on edge, but take away that precious AC and you’ll see a whole new side to it. Instant vacation self-destruction.
After all, if you have to sweat you should be on the beach, not stuck in four lanes of stopped traffic miles from the next rest stop.
Don’t get caught in the ragged heat of the summer blues. It’s supposed to be an enjoyable vacation full of fun and beaches, road trips and sunshine. But it’s not really a vacation if you spend it being miserable and spending money you didn’t have to on hotel rooms because a part on your RV failed you at an inopportune moment.
No one wants their vacation destroyed and no one wants to deal with grumpy kids when they’re taking the RV across the country. Stock up on all your RV and summer vacation needs at Trailer Parts Superstore!!!
Posted Under:
Uncategorized
This post was written by
ghoj on April 7, 2014
Comments Off on RV Time!!
 Here at Trailer Parts Superstore we are constantly looking to expand our product lines and more recently our OEM product lines. We do this so that we can offer direct OEM replacement parts for our customers that desire direct replacements. We have carried OEM replacement parts from trailer manufactures including EZ-Loader, LoadRite, Shorland’r, Magic Tilt, Venture, and Karavan for some time now. We now have the most common custom fit aftermarket replacement Axles for CARRY-ON Trailers.
They are replacement aftermarket trailer axles designed specifically for use with Carry-On open utility & enclosed cargo trailers. These quality aftermarket axles include pre-welded spring seats and have been precisely measured to perfectly fit your Carry-On Trailer frame assembly. Axle weldment includes spindles, spindle nuts, cotter pins & spring seats, Wheel Hubs and bearings sold separately.
We strive to offer our customers the parts that they need. We want to provide a place that you can count on for having the exact parts you need, while also having the ability to deliver those parts as quickly as possible. We are constantly looking to expand our product lines and would love your input to do so.
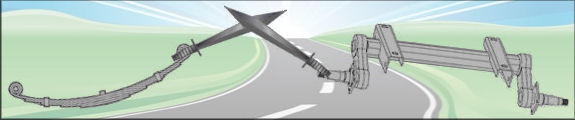
The two most common forms of suspension on general duty trailer axles (1,500 lbs – 5,200 lbs) are going to be leaf sprung or torsion. Leaf Sprung axles can be visually identified by the fact that they will sit either on top of or below a set of leaf springs. A torsion axle will mount directly to the frame and has giant rubber cords in the axle tubing that resist torsion and create suspension. Torsion axles will have torsion arms on both sides of the axle coming down to the spindle. We are going to discuss the Pros and Cons of both suspension systems and a few things to consider.
Leaf Spring Suspension:
Pros: One of the major benefits of a trailer leaf spring suspension is found on a tandem axle application. In a tandem axle application the leaf springs on each side are connected with an “Equalizer Bar”. The Equalizer bar is designed to equally distribute force between both axles. This will limit any damage caused by curbs, potholes, etc. Another positive with leaf spring suspensions is that many of the components are fairly easy and inexpensive to replace in the event of something needing replaced.
Cons: On the other end of the things, because there are a lot of components, there are a lot of components that can break. Another con to leaf spring suspensions is that leaf springs work on the premise of flexing metal. This can sometimes make for a bit of a bumpy ride.
Torsion Suspension:
Pros: Torsion suspension works on the premise of flexing rubber, which will create a smoother ride with less vibration. Another Pro of torsion axles is that, although expensive, they are relatively easy to replace. There is no welding required because they bolt directly to the frame. A torsion axle is a self-contained suspension unit, which eliminates many of the smaller components and moving parts that are found on leaf sprung suspensions.
Cons: Due to the fact that torsion axles are independent from each other, there is no transfer of impact. This means that in the event that a pothole or curb is hit, the full force of that impact will be on that one wheel creating more chance for damage. Secondly, it can be difficult and in many cases impossible to repair a torsion axle. The rubber inside the axle tubing makes welding out of the question, which also means in the event of catastrophic damage, the entire axle would more than likely need to be replaced.

Tis’ the Season for setting up your own Backyard Ice Rink for friends and family. With ice time at the local rink at a premium Backyard rinks are becoming more and more popular. It is perfect for training, practice, family fun, friendly games, and much more. When you have your own backyard ice rink there is no pressure to fit everything in during your you brief ice time slot at the rink. When you have a backyard ice rink, ice time is any time. Here is a quick ‘How to’ for setting one up followed by some pro tips to make your back yard ice rink the best on the block.
HOW TO INSTRUCTIONS
1. Where to Build the Rink. Find the most level area of your yard with relatively dry and solid soil. This space will be your workable area for building a rink. Rinks that have over 18” of water are very challenging to build and more expensive due to requiring additional bracing, more lumber for the rink frame, and increased water required for filling. It is advisable to try to avoid highly sloped areas when building a rink and also to be close to a water source.
2. How Big. Determine the desired size of the ice rink. Keep in mind that it must fit on the workable area that was determined in the step above. The size of your rink will be very important when purchasing a liner. A liner should be at least 4-5 feet longer and 4-5 feet wider than your rink frame.
3. Survey. Precisely determine and document the grade/pitch of your rink outline using a line level or a laser level. The grade will be your guide for spacing the Iron Sleek™ Brackets. It will also guide you on setting your board heights.
4. Layout and Build. Build your frame using the Iron Sleek™ Rink System. Typically, the brackets are spaced 4 feet apart and all corners are secured with Iron Sleek™ Corner Brackets. We strongly recommend using lumber versus plywood. Plywood is not durable and is flexible. For rinks that require higher board heights due to excessive land grade, you should use the Iron Sleek™ Extender Bracket to add extra boards. The major benefit of the Extender Bracket is that it CAN be an afterthought. If your rink is already built and you have an “oh no” moment, you can easily install the Extender Bracket WITHOUT disassembling any component of your rink!
5. Inspect Boards. After the frame is completely built, closely inspect the inside of the rink boards for protrusions or anything that could puncture the liner. Remove all protrusions and sharp ends. Also, be sure the frame is solid.
6. Fill Gaps. Inspect the bottom of the boards for air gaps. If you can slip your fingers between the bottom of the rink frame and the grass, you should back fill the inside of the rink with dirt to fill that gap. Air gaps can allow for liner “bladders” to get under the boards and possibly puncture the liner. A frozen “bladder” may expand to lift or loosen the rink frame. FILL THE AIR GAPS! Do not use snow to fill the air gaps. Snow will melt from the fill water. Use dirt, preferably top soil.
7. Inspect Playing Area. Closely inspect the grass area within your rink frame for anything that can puncture the liner. Also, clear all snow from the rink skating area.
8. Layout the Liner. Carefully stretch your liner inside of the rink frame. Be sure to leave plenty of slack in the corners and to tuck the liner down to the bottom of the boards. Drape the excess liner over the rink frame and the Iron Sleek™ Hardware. This will keep the brackets dryer through a thaw and will keep the boards from absorbing heat on sunny days.
9. The Pour. Fill the rink with water! When you have completed the water fill, the lowest part of your rink should have at least 4” of water. DO NOT LET THE WATER SPILL OVER THE RINK FRAME! If you are close to spilling over, turn off the water and add a “2nd story” of lumber to the high water end using the Iron Sleek™ Extender Bracket.
10. Secure the Liner. After the rink is full of water, you can staple the excess liner to the outside of the rink frame. A flapping liner can end up in the water possibly causing it to escape over the top of the liner.
11. Time to skate. You will need a solid 3” of ice to skate. We recommend you walk and inspect the rink after 3 or 4 days of temperatures under 20°F before skating. A skate that breaks through the ice can tear the bottom of the liner. Do not let this happen! Exercise patience before taking to the ice with skates.
PRO TIPS
Everyone that makes their own Backyard Ice Rink has their own little things that they do to improve the quality of the experience. We are going to go over something’s that will help anyone create a top quality Backyard Ice Rink at low cost.
- One tip to help give your rink a more authentic look is to add lines (red lines and blue lines). One way to do this is with Eco-Friendly paint. Ice Rink Makers have been known to both paint the tarp directly (depending on the depth of the ice) or fill halfway and let it freeze, paint the ice and fill the rest of the way and let freeze over paint.
- Another way to create lines would be again to use Eco-Friendly paint but in a different way. Some Pros will paint Ply Wood (cut in strips), old deck boards, or anything that will lay flat and can be frozen into the rink. Just make sure whatever you use will be flat enough not to protrude through the ice.
- No one likes to miss the net but we all know that occasionally it does happen. We suggest using netting or a mesh tarp strung between two fence posts mounted 20’ to 30’ apart. There are many other techniques to do this but this seems to be the most popular and cost effective.
Posted Under:
Uncategorized
This post was written by
ghoj on December 30, 2013
Comments Off on Backyard Ice Rinks ‘Tips & Tricks’